
Installing solar panels is more than placing panels on a roof. In the USA, the solar panel installation process involves evaluating your home’s energy needs, designing a system. It matches your roof, securing permits, installing the equipment, passing inspections, and receiving utility approval before the system can generate electricity.
If you have a plan to reduce electricity bills, increase home’s value, or switch to clean energy, then you should know installation step. It will help you make informed decisions and avoid costly mistakes. This guide explains exactly how solar panel installation works in the USA from the initial site assessment to system activation.
You will also learn what equipment is installed, how long the process takes, what factors affect installation costs, and what to expect after your solar system starts producing electricity.
What Is Solar Panel Installation?
Solar panel installation is the process of designing, mounting, wiring, and connecting a solar energy system. Panels convert sunlight into usable electricity. In the USA, the process also includes site assessment, permit approval, electrical inspections, and utility interconnection before the system can begin generating power. Indeed, solar panel installation is a complete process that includes planning, permitting, equipment installation, inspection, and utility approval not just mounting solar panels on a roof.
This installation is not just simply placing panels on a roof. A residential solar installation is a carefully planned project. The home solar Installers evaluate your home’s energy consumption, roof condition, orientation, shading, and electrical system to determine the right system size and layout. After the design is approved, mounting hardware, solar panels, inverters, and other electrical components are installed and tested to ensure the system operates safely and efficiently.
How Solar Panel Installation Works (Step-by-Step)
Solar panel installation follows a structured process that begins with evaluating your home’s energy needs. Solar panel installation may take only a few days. The complete process includes planning, permitting, equipment installation, inspections, and final permission to operate.
Step 1: Home Energy Assessment

A home energy assessment helps determine how much electricity your household uses and what size solar system may be appropriate. The installer reviews your utility usage, energy habits, and basic home details.
During this step, the installer asks for recent electric bills, especially the last 12 months if available. That usage history shows seasonal patterns, such as higher summer air-conditioning demand or increased winter electric heating. The goal is not just to cover one month’s bill, but to understand your average annual energy needs.
Homeowners should expect questions about future changes too. For example, if you plan to buy an electric vehicle, add a pool, or switch from gas appliances to electric ones, that could affect system sizing. A good assessment prevents the system from being too small for your lifestyle.
Step 2: Roof Inspection and Site Survey
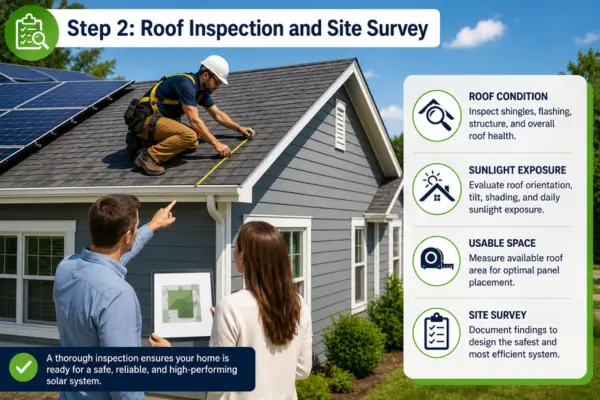
A roof inspection checks whether your roof is safe, strong, and suitable for solar panels. The installer looks at roof age, material (Tile, Tin, Wood, or concrete roof), condition, slope, direction, available space, and shading before recommending a layout.
For rooftop solar, the roof is the foundation of the entire system. If shingles are near the end of their life, it may be better to address that before panels are installed. The installer also checks for vents, skylights, chimneys, satellite dishes, and nearby trees. So that it could reduce usable roof space or block sunlight during energy production hours.
The installer may also look at the attic or framing if structural concerns come up. This step helps homeowners avoid problems later, such as placing panels where shade will lower performance or installing on a roof that may need replacement soon.
Step 3: Solar System Design
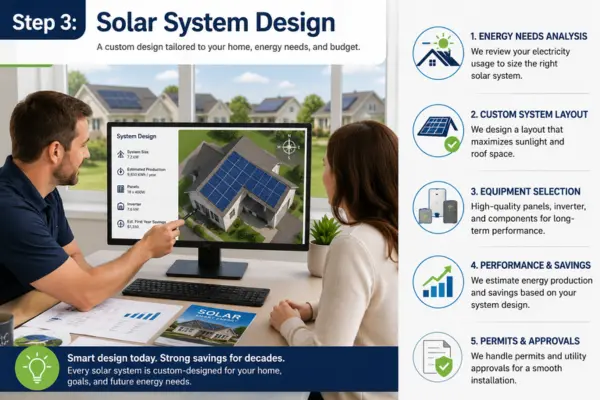
Solar system design includes panel placement, system size, inverter setup, wiring path, and expected energy production. The design team uses your electric usage, roof measurements, sun exposure, and local code requirements to create a layout that fits your home.
They decide where each panel should go, how the panels will connect, and where major equipment will be placed. The solar system design goal is to produce strong solar output while keeping the system safe, code-compliant, and practical for your roof.
Step 4: Permits and Utility Approval
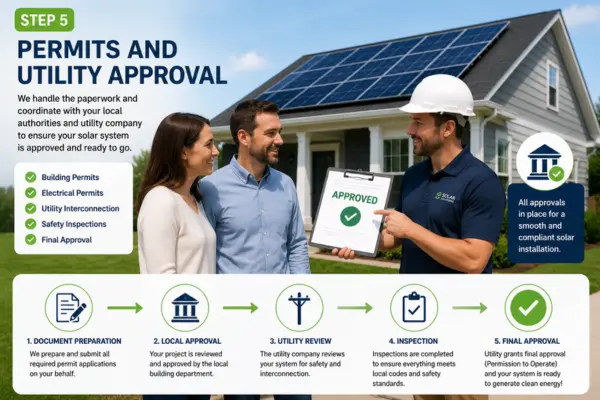
Before installing any equipment, your solar project must receive approval from the local building authority and your electric utility. This step ensures the system meets building codes, electrical safety standards, and utility requirements.
Most homeowners don’t need to handle the paperwork. Your solar installer prepares and submits the permit applications, engineering documents, and utility interconnection forms on your behalf.
The approval timeline varies by location, so it’s normal for this step to take longer than the physical solar installation. If additional documents or design changes are requested, your installer will update the application before work begins.
Step 5: Mounting System Installation
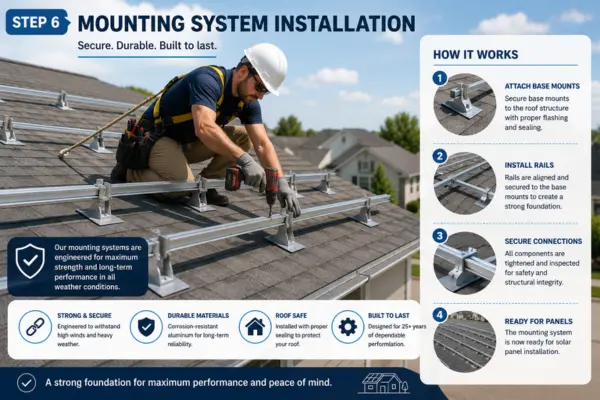
Roof mounts create the foundation that supports your solar panels. They are securely attached to the roof structure so the system can withstand wind, rain, and other weather conditions for many years.
Before installing the mounts, the installer carefully marks the attachment points based on the approved system design. Each mounting point is fastened into the roof framing rather than just the roofing material. Flashing and waterproof sealants are installed around every penetration to help protect the roof from leaks. Once the mounts are in place, aluminum rails are attached and aligned to create a level surface for the solar panels.
Step 6: Solar Panels Installation
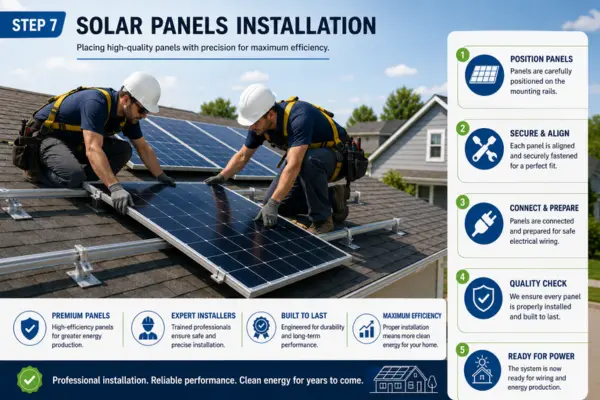
Once the mounting system setup is complete, the solar panels are placed onto the rails according to the manufacturer’s installation guidelines. Each panel is carefully lifted onto the roof and positioned in the planned layout. Installers secure the panels with specialized clamps that hold them firmly.
As each panel is installed, electrical connectors are attached to create a continuous circuit that will later connect to the inverter. For homeowners, this is usually the most noticeable part of the project because the roof quickly transforms from an empty surface into a functioning solar array.
Before leaving the roof, the installation team checks that every panel is properly fastened, evenly aligned, and free from visible damage. These final inspections help ensure the system is ready for the next stage of electrical installation.
Step 7: Inverter Installation
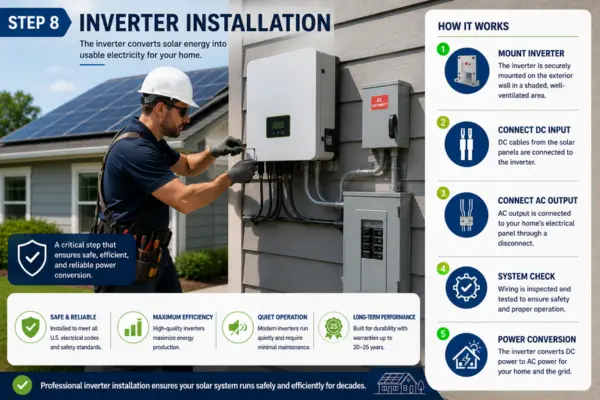
The inverter is installed to convert the electricity from your solar panels into power your home. For many residential systems, the inverter is mounted on an exterior wall near the electrical panel or inside a garage. If the system uses microinverters, smaller inverter units may already be attached behind each panel instead of using one central inverter.
A good location of installing inverter is shaded, secure, and close enough to the electrical equipment. The installer will also label the equipment clearly so inspectors, utility workers, and future electricians can identify the solar components safely.
Step 8: Electrical Wiring and System Connection
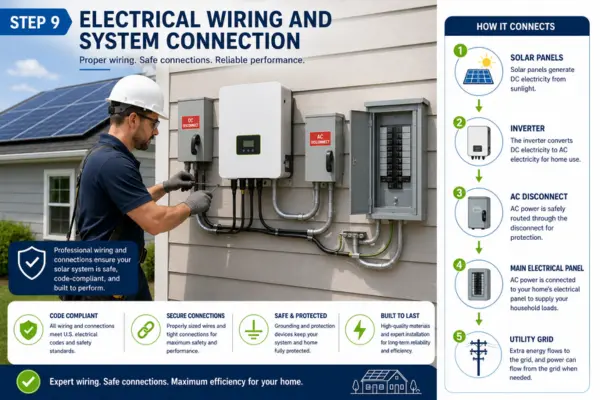
Electrical wiring connects the solar panels, inverter, electrical panel, and required safety equipment into one working system. This step is where the installed hardware becomes a complete solar power setup.
The technician routes wiring from the solar array to the inverter and then to the home’s electrical system. Depending on the design, wiring may run through conduit on the roof, along the side of the house, through the main service panel. Installers also add required disconnects, circuit breakers, labels, and grounding components. So that the system can be safely shut off and inspected.
Step 9: Final Inspection and Permission to Operate (PTO)
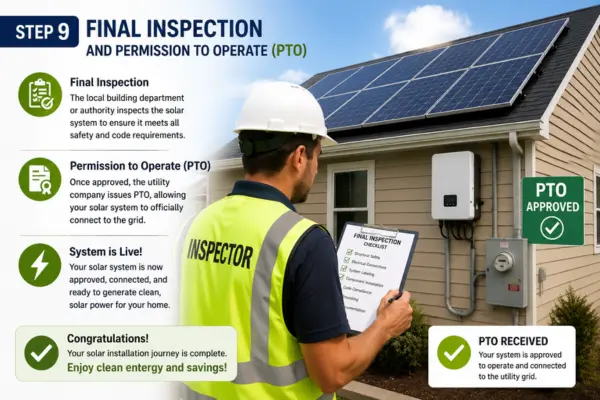
After installation, the system must pass inspection and receive permission to operate before it can officially run. This final approval confirms the solar system was installed safely and is allowed to connect to the utility grid.
A local inspector usually checks the mounting, wiring, labeling, inverter, disconnects, and electrical connections. If something needs correction, the installer fixes it and schedules a follow-up inspection. Once the local inspection is approved, the utility reviews the project and may install or update the electric meter.
Homeowners should not turn the system on before approval, even if all equipment appears ready. The utility must issue permission to operate, often called PTO, before the system can legally send power to the grid. Once PTO is granted, the installer can activate the system, confirm it is producing electricity, and show the homeowner how to read the monitoring app or inverter display.
What Is a Residential Solar System?
A residential solar system is a home energy setup that uses solar panels to convert sunlight into electricity for household use. Most solar systems are installed on the roof and connected to the home’s electrical panel.
In the United States most residential systems are grid-tied. It means the home remains connected to the local utility. In that case, solar production changes throughout the day. Your panels may produce more power at noon than in the evening, so the grid acts as a backup source when solar production is low.
For example, a family in Florida may use solar power during the day to run air conditioning, laundry, and kitchen appliances. At night, when the panels are not producing electricity, the home automatically uses electricity from the grid.
| Component | What It Does |
| Solar panels | Capture sunlight and produce electricity |
| Inverter | Converts solar electricity into usable home power |
| Mounting system | Secures panels to the roof |
| Electrical wiring | Connects the system to the home |
| Monitoring system | Tracks solar production and performance |
A residential solar system matters because it can help homeowners reduce dependence on utility electricity, manage long-term energy costs, and use cleaner power generated directly from their property.
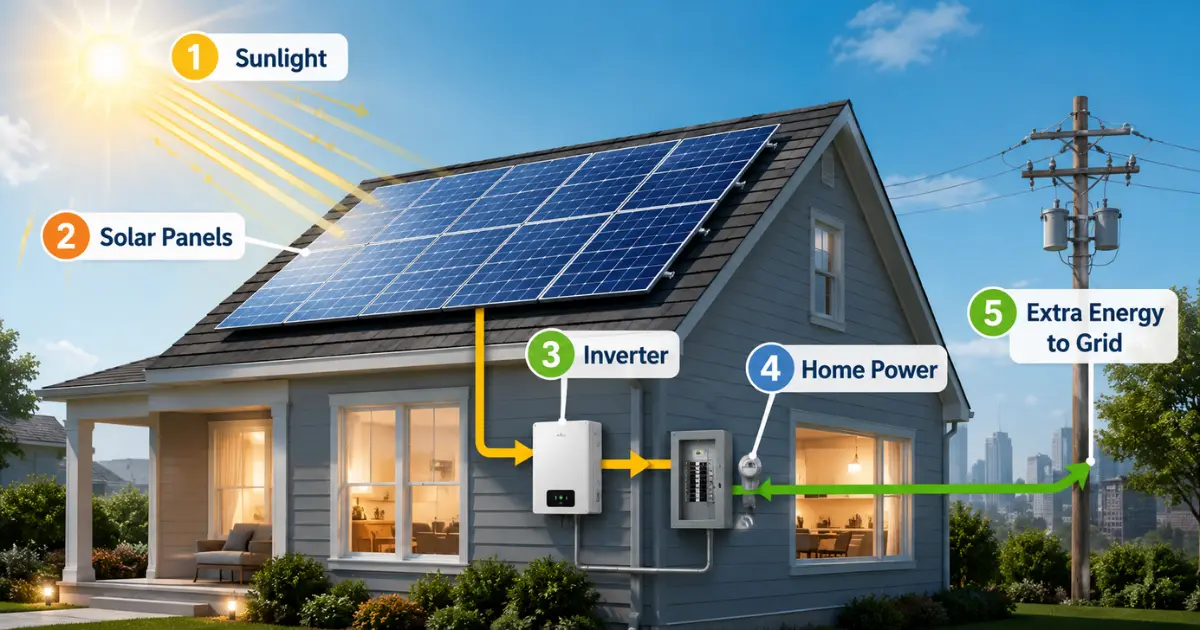
How Rooftop Solar Works
Rooftop solar works by capturing sunlight through panels installed on your roof. The system produces the most power during sunny daytime hours, then sends usable electricity through an inverter and into the home electrical system.
The process starts when sunlight hits the solar panels. Inside each panel, photovoltaic cells create direct current electricity. The inverter changes that power into a form your home can safely use.
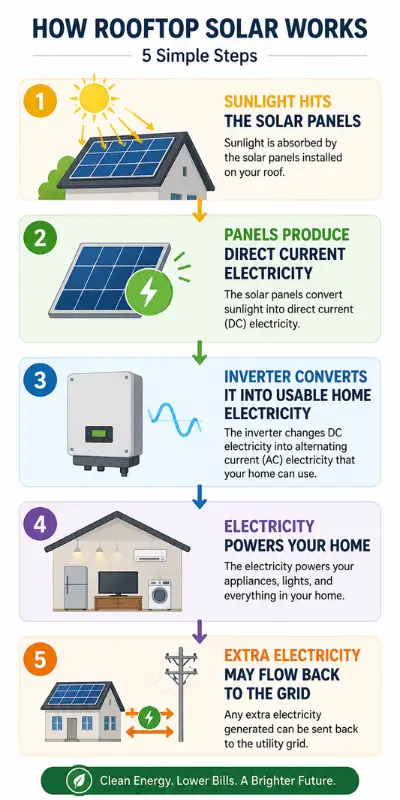
Once converted, solar electricity flows into your main electrical panel and powers whatever is running in the house at that moment. This could include lights, refrigerators, air conditioners, computers, or other appliances. If your home needs more electricity than the panels are producing, the grid supplies the difference automatically.
If your system produces more electricity than your home is using, the extra power may be sent back to the utility grid, depending on your local utility rules. In some areas, homeowners may receive bill credits through net metering or similar programs.
A simple way to understand it:
| Step | What Happens |
| 1 | Sunlight hits the solar panels |
| 2 | Panels produce direct current electricity |
| 3 | Inverter converts it into usable home electricity |
| 4 | Electricity powers your home |
| 5 | Extra electricity may flow back to the grid |
Think of rooftop solar as a small power plant on your home. It does not replace every part of the utility system, but it can reduce how much electricity you need to buy from the grid during the day.
Main Components of a Solar System
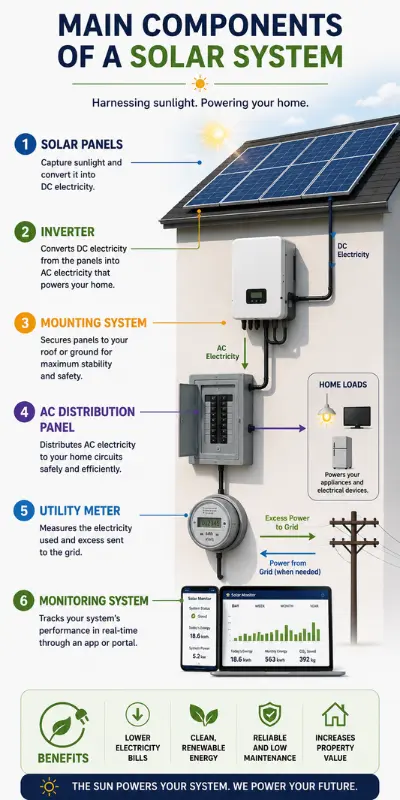
A residential solar system is made up of several key components that work together to generate, convert, and deliver electricity to your home. The solar panel main components are inverter, mounting system, monitoring platform, cables, connectors, protecting devices, and optional battery storage. All the component plays important roles in ensuring the system operates safely and efficiently.
Solar Panels
Solar panels are the primary component of a solar energy system because they capture sunlight and convert it into direct current (DC) electricity. Most residential systems use high-efficiency solar panels (monocrystalline or polycrystalline). The panels are designed to withstand rain, snow, wind, and temperature changes for decades.
Solar Inverter
The solar inverter converts the direct current (DC) electricity produced by the panels into alternating current (AC) electricity. Without an inverter, the electricity generated by the panels cannot be used by most household appliances. This is because home electrical system is AC. Residential systems use one of three inverter types:
- String Inverter: A single inverter connected to multiple panels.
- Microinverter: A small inverter installed behind each individual panel.
- Hybrid Inverter: Supports both solar panels and battery storage.
The right inverter depends on your roof layout, shading conditions, and whether you plan to add a battery in the future.
Mounting System
The mounting system securely attaches the solar panels to your roof while keeping them properly positioned for sunlight exposure. It also protects the roof by using flashing and weatherproof sealing around attachment points.
Most residential mounting systems are made from corrosion-resistant aluminum and stainless steel to withstand years of outdoor exposure. Installers carefully position the rails to ensure the panels remain level, secure, and able to resist strong winds and heavy snow loads where applicable.
Monitoring System
A solar monitoring system tracks your solar system’s performance in real time. It allows homeowners to see how much electricity the system is generating, identify unusual performance drops, and monitor long-term energy production.
Most modern solar systems include a mobile app or web dashboard where you can view daily, monthly, and yearly production data. Regular monitoring helps homeowners detect potential issues early before they affect overall system performance.
Battery Storage (Optional)
Battery storage allows a solar system to store excess electricity produced during the day for use later when solar panels are not generating power, such as at night or during a power outage.
Many U.S. residential solar systems remain connected to the utility grid without batteries, storage. This method is becoming increasingly popular for homeowners seeking greater energy independence or backup power during outages.
For example, if your solar panels generate extra electricity on a sunny afternoon, a battery can store that energy instead of sending all of it to the utility grid. Later in the evening, your home can use the stored electricity, reducing the amount of power purchased from the utility.
Battery storage is optional, but it can improve energy resilience and help homeowners make better use of the electricity their solar system produces.
How Long Does Solar Panel Installation Take?
For most U.S. homeowners, installing solar panels on the roof takes 1 to 3 days, but completing the entire project usually takes 4 to 12 weeks. The difference comes from the time needed for system design, permit approvals, inspections, and utility permission before the system can be turned on.
Solar Panel Installation Timeline
A residential solar project moves through several stages before your system starts generating electricity. The installer may only be on your property for a few days, most of the project happens behind the scenes.
| Project Stage | Typical Time |
| Initial consultation and home assessment | 1–3 days |
| Roof inspection and system design | 3–7 days |
| Permit review and utility application | 2–6 weeks |
| Equipment scheduling | 3–10 days |
| Solar panel installation | 1–3 days |
| Electrical inspection | 1–7 days |
| Utility approval (Permission to Operate) | 1–4 weeks |
Example: A homeowner in North Carolina signs a contract in June. The installer completes the design within a week, receives permit approval after two weeks, installs the system in two days, and obtains utility approval three weeks later. From start to finish, the project takes about eight weeks.
Factors That Affect Solar Installation Time
Every home is different, so installation timelines can vary even when two projects are in the same neighborhood. Several factors influence how quickly your system moves from planning to activation.
- Local permitting requirements are often the largest variable.
- Utility interconnection approval also affects the schedule.
- Roof condition plays an important role.
- System complexity can also make a difference.
- Weather and installer availability may temporarily delay rooftop work.
While every project is unique, homeowners with a well-maintained roof, straightforward system design, and efficient local permitting process typically experience the shortest installation timelines.
How Much Does Solar Panel Installation Cost in the USA?
The cost of solar panel installation in the USA varies based on the size of the system, equipment selected, your home’s characteristics, and local labor costs. For most homeowners, a residential solar installation falls within a broad price range, making it important to request a customized quote rather than relying on national averages alone.
Average Installation Cost
Before incentives, a typical residential solar system in the United States generally costs between $15,000 and $30,000 for an average-sized home. Smaller systems usually cost less, while larger homes with higher electricity usage may require a larger investment.
The final price normally includes:
| Cost Component | Typically Included |
| Solar panels | Yes |
| Inverter | Yes |
| Mounting hardware | Included |
| Electrical equipment | Yes |
| Professional installation | Yes |
| Permits and inspections | Usually included |
This provides a general cost overview. The exact price depends on the system designed for your home’s energy needs.
Factors That Affect Cost
Several factors influence how much you’ll pay for a residential solar installation in the USA.
- System size
- Roof characteristics
- Equipment selection
- Installation complexity
- Location
Because every home is different, the most accurate way to estimate installation cost is through a professional site assessment and customized system design.
Common Solar Installation Mistakes
A successful solar installation depends on more than choosing quality equipment. Common mistakes made before or during the installation process can reduce system performance, increase project delays, and lead to unexpected expenses. Understanding these issues helps homeowners make informed decisions and avoid solar panel installation problems that could affect the long-term value of their solar investment.
Poor Roof Assessment
Skipping a thorough roof assessment is one of the most common installation mistakes. A roof may appear to be in good condition from the ground. But it may have hidden issues such as aging shingles, structural damage, poor drainage, or excessive shading can affect the success of a solar project.
Before installation, the roof should be evaluated for its condition, remaining lifespan, orientation, available space, and daily sun exposure. Installing solar panels on a roof that will need replacement in a few years often means paying to remove and reinstall the system later.
Choosing the Wrong Installer
The installer plays a major role in the quality, safety, and reliability of a solar system. Choosing a contractor based only on the lowest price can result in poor workmanship, incorrect system sizing, or inadequate customer support after installation. To avoid those things choose the best solar panel installer and feel relax.
Homeowners should look for installers with proven residential experience, proper licensing where required, strong customer reviews, clear warranty information, and a history of completed projects. Asking questions about the installation process, equipment recommendations, and post-installation support can also help identify a qualified professional.
Ignoring Local Permits
Every residential solar installation must comply with local building and electrical requirements. Ignoring permit requirements or attempting to bypass inspections can delay the project and create legal or safety issues.
Professional installers manage the permitting process and coordinate required inspections before the system is connected to the utility grid. These approvals help verify that the installation meets applicable building codes and electrical safety standards.
After Installation: What Happens Next?
Once your solar panels are installed, the project is not quite complete. Before the system begins generating electricity, it must pass final inspections, receive utility approval, and be activated. After that, regular monitoring and basic solar system maintenance help keep the system operating efficiently for years to come.
System Inspection
After installation, a local building or electrical inspector reviews the system to verify that it complies with applicable building codes and electrical safety requirements. The inspection includes the solar panels, mounting system, inverter, wiring, disconnect switches, and equipment labeling. If any minor corrections are required, the installer completes them before requesting a final approval.
Utility Connection
Once the inspection is approved, the utility company completes the final review and authorizes the solar system to connect to the electrical grid. This approval is commonly known as Permission to Operate (PTO)
Depending on the utility, the company may inspect the connection, update the electric meter, or complete other interconnection requirements before granting approval. Homeowners should wait until PTO is issued before turning on the system to ensure it operates safely and in compliance with local utility rules.
Monitoring Your Solar Production
Most modern residential solar systems include a monitoring platform that allows homeowners to track system performance through a mobile app or web portal.
Monitoring makes it easy to view:
- Daily electricity production
- Monthly and yearly energy generation
- System performance trends
- Alerts for potential equipment issues
For example, if your system consistently produces less electricity than expected, the monitoring platform may help identify the issue early so it can be inspected before it affects long-term performance.
Checking production periodically helps confirm that your system continues to operate as designed.
Basic Solar Maintenance
Residential solar systems require very little routine maintenance. In most parts of the United States, rainfall naturally removes much of the dust and debris that collect on solar panels.
Homeowners should still perform occasional visual inspections to check for leaves, branches, bird nests, or other debris that could block sunlight. It is also a good idea to monitor the system’s production data and schedule a professional inspection if performance drops unexpectedly.
Simple maintenance habits can help maximize energy production throughout the system’s lifespan.
| Maintenance Task | Recommended Frequency |
| Check monitoring app | Monthly |
| Inspect panels for debris | Every few months |
| Trim nearby trees if needed | As required |
| Schedule professional inspection | If performance declines or concerns arise |
| Maintenance Task | Recommended Frequency |
| Check monitoring app | Monthly |
Choose experienced professionals, ensuring proper permits, and maintaining your system after installation all contribute to reliable long-term performance.
Frequently Asked Questions
Can I install solar panels on an older roof?
It depends on the roof’s condition rather than its age. If your roof is nearing the end of its lifespan, it’s usually recommended to repair or replace it before installing solar panels.
Do solar panels work on cloudy or rainy days?
Yes, solar panels continue generating electricity on cloudy or rainy days. But production is lower than on sunny days. Energy production relies on daylight not direct sunshine. So, they can still produce power whenever there is available sunlight.
Can solar panels be installed on every type of roof?
Most residential roofs can support solar panels, including asphalt shingle, metal, tile, and flat roofs. However, the installation method varies depending on the roofing material, roof condition, and structural integrity.
Will my home lose power if the electric grid goes down?
Most standard grid-connected solar systems automatically shut down during a power outage to protect utility workers. To keep your home powered during an outage, you’ll need a battery storage system or a backup power solution.
How do I know if my roof gets enough sunlight for solar?
A professional installer evaluates roof orientation, shading, roof pitch, and annual sunlight exposure during the site assessment. Even if part of your roof receives shade, other sections may still provide enough sunlight for an effective solar installation.
Is a south-facing roof required for solar panels?
No. South-facing roofs generally produce the most electricity in the United States, but east- and west-facing roofs can also perform well. The best roof direction depends on your location, energy usage patterns, and available roof space.
Can I add more solar panels in the future?
Yes, many residential solar systems can be expanded if your energy needs increase. However, expansion depends on available roof space, inverter capacity, electrical panel limits, and local utility requirements. Planning for future growth during the initial system design can make upgrades easier.
What should I do before my solar installation appointment?
Clear the driveway and work areas, trim overhanging tree branches if requested, and ensure installers have access to your electrical panel and attic if needed. Your installer will let you know if any additional preparation is required before installation day.
Will installing solar panels increase my home’s value?
In many cases, homes with owned solar energy systems are more attractive to buyers because they may offer lower electricity costs. However, the effect on resale value depends on factors such as system ownership, local market conditions, and buyer demand.
How long do residential solar panels typically last?
Most residential solar panels are designed to operate for 25 to 30 years or longer with proper installation and routine maintenance. While energy production gradually decreases over time, quality panels continue generating electricity well beyond their warranty period.
Final Thought
Solar panel installation is a structured process that begins with evaluating your home’s energy needs and ends with utility approval and system activation. Understanding each step from roof assessment and system design to installation, inspection, and ongoing monitoring helps homeowners make informed decisions and know what to expect throughout the project.